Proper cable management can make a huge difference in the look and feel of your desk.
We all can appreciate the look of a desk that has all its cables tidy and hidden away from sight. Computer wires just distract from what could be a great-looking desk.
The downside with glass tables it becomes a little more tricky to hide all those cables. With normal desks, you can just attach everything underneath the table without consequence.
With glass tables, however, you might feel stuck looking at those cables at all times and at all angles. In this article, we’re going to talk about how to hide away all those computer wires and cables like a pro so you can have a desk that looks like this:
Key Takeaways
- Group your cables together. Instead of having 5 wires going in 5 directions, we’re going to have one cable bunch going in one direction for as long as possible.
- Sheath your cable bunch in a color that matches your wall or your desk frame color. This will make it easier to hide as you route your cable bunch along the lines of your desk. It’s a key point we discuss in our guide on how to hide cords for desks in the center of a room..
- Fix those cables in place once well hidden along the natural lines of your desk setup. Tidy up what’s left. Keep reading for a more detailed breakdown.
Let’s walk through all the steps necessary for peak cable management on glass desks. If your desk looks like the image below, you will see a huge improvement after taking action here.
1) Group Cables
The first step here is to group as many cables together as possible if they travel together. If they travel together for even a couple of inches, group them!
Your monitor at a minimum has a display cable and a power cable. Treat those two cables as best friends. As your cables travel together, they should only part ways when necessary.
Take the monitor example I just made. Your display cable goes to your computer and the power cable to the wall. Your computer also has a power cable going to the wall.
You can keep the display cord and monitor power cord together all the way to the computer. Then the monitor power cable can follow the computer power cable all the way to the wall.
Here’s a graphic showing what I’m talking about in case that sounded like nonsense.


One of these images already looks more organized than the other!
Another advantage here is that this method uses up more length of your cables. Because these cables have to travel a longer distance, you are less likely to have extra cable lying around after you complete the routing.
A lot of cable management issues are just dealing with excess cables, so this step helps!
Keep some slack for the wires that require flexibility when grouping cables. For example, if you have a wired mouse, you’ll need some movement freedom there.
Grouping Accessories
Now that we made it clear why we should group our cables, we need to actually hold them together.
There are tons of products on Amazon that are made for cable management. We’re going to simplify all that Amazon noise and show you the ones that are worth your time.
Cable Management Sleeves
There are two types of cable management sleeves that help group wires very cleanly.
Split Tube Sleeving
First up is my personal favorite: mesh split tube cable and wire sleeving.

This black wire loom is split and easy to load wires. They come in a large range of diameters and lengths depending on how many cables you need to manage. It groups your individual cables and wraps them in this aesthetically pleasing mesh wrap.
This is essentially a mesh material that is pre-curled to make a tube shape. It is split in half so you can open up the tube shape to drop in wires at any point.
This mesh sleeving really emulates a professional braided cable look when used correctly. Check out all of the cables on the back of my monitor being grouped into a single bunch.

I talk more about monitor cable management specifically in this article.
This split sleeve comes in a large variety of diameter and length sizes for whatever your needs are. Diameters are as small as ⅛ inch to as large as 1.25 inch in diameter.
These diameters curl and compress on themselves, so it’s always safer to go larger than smaller.
Zippered Sleeving
The next solution that is also wildly popular is zippered cable management sleeves.
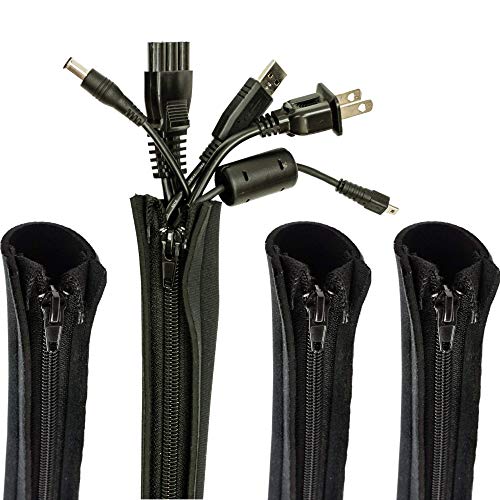
This set of 4 cord cover sleeves made from durable and flexible neoprene fabric with a zipper can conceal and manage unsightly cords while ensuring fast access. It takes up to 10 cables each, making it perfect for cleaning up cable-heavy desk setups.
These are usually larger in diameter so they can really handle anything. The fabric that is zipped together is also flexible. This brings up the capacity nicely and still holds everything together well.
A big advantage this has over the split tube sleeving is that this can be unzipped and laid out flat. That makes installation a real breeze.
If you have a lot of cords and are really dreading the management process, this will certainly make your life easier.
In my opinion, the split sleeving is more attractive, but this zippered sleeving is more convenient.
2) Match Colors
Now that we are introducing cable management products, it’s important that we talk about colors.
Cable management is mainly about hiding cables, but we really want to hide the management tools we use as well. We have to keep our cables and groupings camouflaged with our desks.
The best way to do this is to match the color of the cable sleeving with the color of your glass desk frame. Chances are, your glass desk frame is either black, white, or wooded. Most likely black as that is more common in the market of glass desks.
Choosing a cable sleeving of the same color will blend it into your desk very well. You don’t want a black sleeve if you have an all-white glass desk. That’s just asking for it to stick out like a sore thumb!
Keep your color coordination in mind when choosing your cable management accessories! This will be even more important going into our next step!
3) Follow The Lines
This next tip is really where we start to move into pro-level cable management.
We know how and why to group cables together as they travel together. We also know it is critical to match the colors of the accessories we buy to the color of your glass desk frame.
What if we hid that group of wires entirely? Let’s talk about following the lines.
Your glass table top eventually touches your floor through your desk frame or legs.
Guide your cable-sleeving bundle along these legs or frame lines. The result will be cables that more or less disappear. It is important to guide your sleeving bundle along the backside of your desk frame or legs.
This really makes them invisible to you when looking head-on! And because they are the same color as your desk frame, they are imperceivable without a closer look.
I followed this same idea to make all my monitor cables disappear, try to spot them in the image below. Not a cable in sight!

If for some reason you need more structure or a guide to place your cables in, you can use these cable runways. They hide your cables and typically have an adhesive back so you can fix them anywhere!
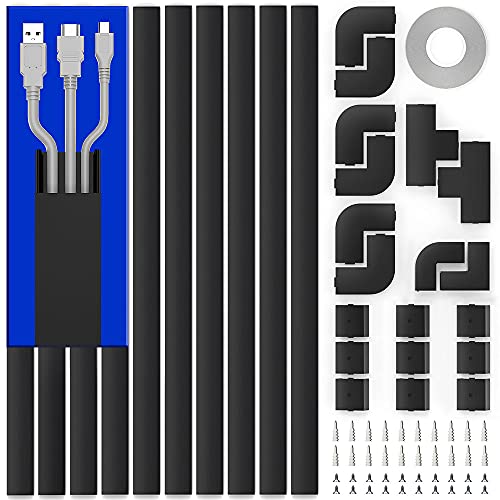
This cable hider housing adheres to your wall to conceal cables as they travel around your desk. It also protects kids and pets from cords and is easy to install with simple instructions.
4) Fix Cables In Place
We are getting close to the end here! There are two small steps left for our management to be on the professional level.
Now that cables have been guided along our frame, we need to fix them in place so they don’t move around.
This is a simple step. If you are okay with zip ties, that is a quick and dirty solution. I personally don’t like the look of zip ties. I prefer velcro strips that match the color of my frame.
This velcro pack on Amazon comes in a bunch of different colors for pretty much any desk frame color you have.
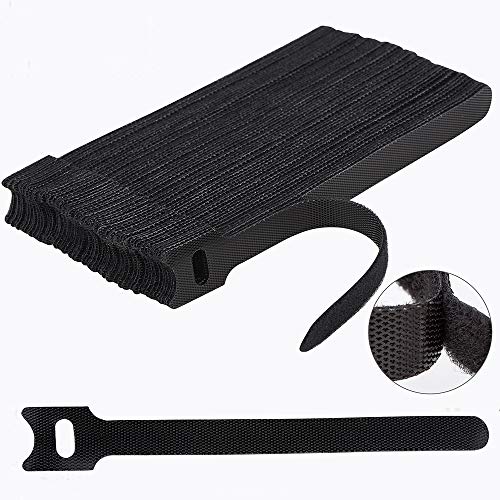
These reusable cable ties are made from nylon and can be used multiple times. They are versatile and can be used to wrap and group loose cords. The cable ties are easy to use and remove or adjust when needed.
If you are unsure that pre-cut velcro strips will be long enough, you can get a large continuous roll of velcro. This way you can cut exactly the length you need and get a more custom-fit solution.

This double-sided velcro tape allows you to cut custom-length ties to wrap unsightly cables together. It comes in a size of 3/4-Inch width x 10 yards, giving you plenty to work with. It's easy to install and made of hook and loop material that is reusable for your fastening needs.
Another pro tip: hide the tail end of the velcro or zip tie by facing it towards the back side of the desk. That way you only see a clean loop from the front. That is if you can see it at all now that we matched colors!
The roll of velcro linked above comes in two different thicknesses. You don’t need a very thick roll of velcro to hold cables to your frame. Velcro is plenty strong when it’s brand new.
6) Cover Up What’s Left
Finally, our last step!
You might have some excess cable left over at the end of all this management. You might also have some power bricks that don’t fit in any sleeving. Or even awkward lengths of cable that have no place to go.
The last stop on this glass table cable management adventure will be management boxes!
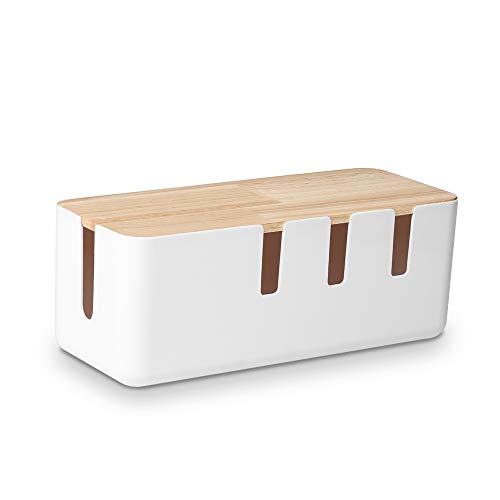
These management boxes are large cases that can hold an entire surge protector, along with all of the stuff that didn’t fit in our sleeving. As we discuss in our article on the safety of cable boxes, they are pretty safe.
Don’t just go stuffing everything in these boxes! We have come so far, let’s keep it clean and professional!
Any excess lengths of cables should be folded and tied to make a clean cable bundle. Use your zip ties or velcro strips to keep your cables tidy. Only leave slack on cables that require it due to regular movement.
After you have everything tidy, place them in the cable management box in a way that is organized and stable.
Viola! Now our glass desk should just have a box at the bottom with a power cord to the wall. And nothing else is visible!
If you do end up moving away from a glass desk in the future, check out some of these desks that have built-in cable management. If you want to learn more cable management techniques, check out our articles on hiding wires on top of your desk and hiding wires underneath your desk.