So you bought a brand new dedicated mic for your setup to give others crystal clear audio. But now you run into another issue: where do you put it?
Dedicated microphone arms and stands are notorious for being awkward to position. We need to make sure it doesn’t obstruct the view of our monitors. At the same time, we also need to keep it close to our face for quality audio.

Today we’re going to talk about where you should put your mic on your desk without blocking your monitors and still maintaining good audio quality.
The “Safe Zone” for Desk Microphones
The first thing you want to do is get an idea of the visual “safe zone” for your microphone. This is the area where a microphone can be placed without obstructing the view of your monitors.
The graphic below illustrates the areas of your desk setup that will and won’t work in a typical desk setup.
As shown, the red area illustrates the viewing angle of your monitor(s). We don’t want to obstruct this area at all.
The blue area above your eye line is a tricky but possible place to position a microphone. It clears your monitors, but it’s tricky because it’s a bit further away from your mouth.
Many people can make this overhead mic position work. It mostly depends on how much background noise you have and relies on tuning your sound settings.
The green area in the image below, beneath the eye line, is the ideal place for a mic to be positioned. This area is closer to your mouth and doesn’t block the view of your monitors.

Now that we have that out of the way, let’s talk about where we can actually clamp or place a mic on our desks.
Make More Room on Your Desk
If you have a crowded desk, you’ll be much more limited on your mic placement options. For this reason, I recommend folks free up desk space with the following methods:
Use Desk Clamp Monitor Mounts
Factory monitor stands are bulky and take up a ton of desk space. They can block potential mic arm placement options.
Aftermarket VESA monitor arms free up a ton of space and are not very expensive. Look how small my monitor stand footprint is in the image below:

This smaller mount makes the “under monitor” mic arm placements much more realistic.
Consider Monitor Light Bars Instead of Desk Lamps
If you can get something off of your desk and onto your monitor, it’s a great way to save space.
A good example is using a monitor light bar instead of a traditional desk lamp. Monitor light bars simply sit on top of your monitor instead of sitting on your desk.
So instead of a desk lamp sitting at the corner of your table, you free up that space to be a potential microphone mounting location. Also, monitor light bars are superior desk lamp replacements in every way.


Check out this article to learn more about why monitor light bars are so great. Also, I’ve tested a bunch of different monitor light bars over the years, here are my tested monitor light bar recommendations.
Along the same lines, I try to mount as much as I can to my monitor to free up desk space. I currently mount my Govee light bars to the back of my monitor along with the control box, as seen in the image below.

Embrace Minimalism
If you have a ton of things on your desk, I recommend you check out our article on minimal desk setups. Minimal setups consist of only leaving out what you absolutely need on your desk.
That means your PC, keyboard, mouse, monitor, speakers, desk mat, and maybe one or two personal touches; that’s it. This keeps more of your desk space available for mic placement.
I’m still working on having a very minimal setup. However, overall, this minimal mindset has made my desk look way better and helped me focus a lot more when working at my desk as well.

If you want to learn more ways to make room on your desk, we talk about making more desk space in detail here.
Types Of Mic Stands
Depending on the mic stand you have, you will have different setup options that make your mic placement convenient. A desk mount mic stand will have a different recommended position compared to a table stand mic.
There are two main types of mic stands. Stands that clamp-mount onto your desk and free-standing mics. Free-standing mics are simply microphones with tabletop stands.
Clamp Mount Mic Stands
Clamp mount mic stands need a small area of your desk and can extend pretty far in any direction depending on the stand. This is great if you want your mic stand to take up as little desk space as possible.
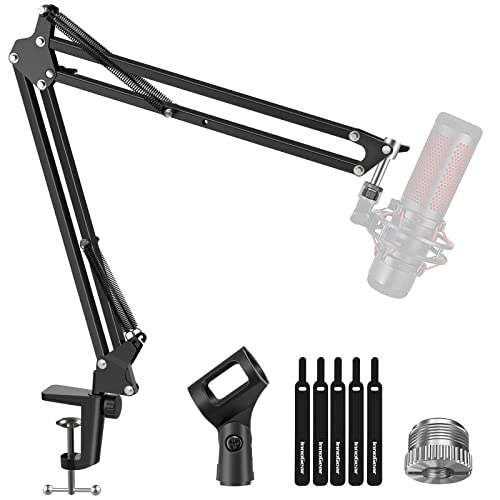
These are the main types of mic arms that give us a challenging placement job.
These types of mic stands are generally superior to free-standing mic stands when it comes to sound quality. They are large suspension arms that isolate all the little table vibrations from your mic.
Free-Standing Mic Stands
Free-standing mics are very simple to use and don’t have a huge boom arm that needs to travel across your desk. Because they are simpler devices, they are cheaper and won’t take up as much air space.
The downside with mic stands that sit on your desk is that they will pick up a lot more table vibration noise. This can be solved by using a foam pad under the mic or something similar that can absorb some vibration.

Other Mic Arms
There are other mic stands out that you might also want to keep on your radar.
One example is floor-standing mic arms that take up zero desk space. Another option that takes up zero desk space is wall-mounted mic arms.
Most people don’t use these mics, but it’s helpful to know they exist! Now let’s talk about where to put your mic on your desk, depending on which stand you have.
The Best Locations For Your Desk Microphone
Where To Put Tabletop Desk Mic
Tabletop desk microphones are the simplest ones to place. If you have a decently long cord you can take it to and from a convenient storage spot towards the back of your table.
It can simply slide right in front of you and be placed in front of your chin. This one doesn’t need too much diving into because of how simple it really is.

The first step is to give your tabletop mic enough cable slack so it can be used and stored without any issues. The amount of slack will depend on your table size and storage position.
Once you have enough slack, dial in your microphone’s height. Ideally, the microphone should be 6-12 inches away from you. Once you get the perfect position, you’re done!
Simply slide that mic into the storage position until you are ready to use it.
Where To Put Clamp Mount Desk Mic
Clamp desk microphone arms have way more positioning options due to their range of travel. The linkage system gives you a huge amount of positional flexibility so you can dial in your position perfectly.
The spring-loaded mechanism is to help hold the load in different positions. Lower-end microphone boom arms have exposed springs while the high-end stands have hidden springs.
There are two types of people when it comes to microphone arms. Those who like the way a microphone stand looks on your desk, and those who don’t.
If you are in the first category, you will have more options. Placing your mic arm on either side of the desk towards the front edge is a very functional solution if you don’t mind the look.
In this scenario, the mic approaches you from the side. This is a great way to make sure the mic is not covering up your field of view.
If you want to hide your mic when it’s not in use, clamping towards the back side of your desk, behind your monitor is the way to go. This keeps your desk setup looking super clean, but also functional. The entire mic arm linkage can be hidden behind a set of monitors.
When you want to use your mic, simply reach behind your monitor, lift and articulate it in front of you. When you are done, articulate back in its storage location.
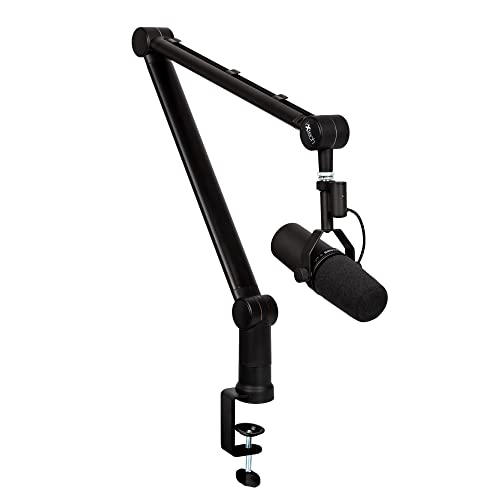
To do this well, you will need a more low-profile microphone arm. Here’s an example of a low-profile monitor arm that will fit in the gap underneath most monitors.

- All metal construction
- Low profile for natural placement
- Cable channels hide wires
- Long 29 inch reach
- Clamps on desks up to 2.4 inches thick
- Pricey, but you get what you pay for
Check out this video for more tips on microphone boom arm setup!