If you’ve heard the term “VESA Mount” and have no idea what it means, you’re not alone.
In short, VESA mounts are a standardized mounting hole pattern for flat displays.
Just like all gasoline cars can accept a standard gas nozzle at the gas station, mountable computer monitors that follow the VESA standard can use any VESA compatible monitor mount.
Standards like this are important because this requires manufacturers to follow minimum requirements for a product’s design, safety, and functionality. We all benefit from this standard!
In this article, we’re going to go in depth on everything you need to know about VESA mounts for monitors. We will lightly touch on what else the VESA group covers, but this is mostly going to cover VESA mounts as they relate specifically to computer monitor mounting.
What Does VESA Stand For?
VESA stands for the Video Electronics Standards Association.
They are an international group that represents hundreds of corporations worldwide. This group sets industry standards for computers, workstations, and other consumer electronics all in the display industry.
They have a TON of public standards in the areas mentioned above. Monitor mounting is just one of them.
What Is a VESA Mount?
VESA monitor mounts refer to monitor mounts that have the standard 100x100mm or 75x75mm mounting hole pattern.
This hole pattern is specifically defined in VESA’s Flat Display Mounting Interface Standard, or FDMI. You can find the entire VESA mounting standard here.
If you read through this document, you’ll see that VESA has different mounting hole patterns for different size screens. That’s why a VESA monitor mount will look different from a VESA television mount.
The 100x100mm & 75x75mm pattern is specifically for flat displays between 12 to 22.9 inches. The high end of that range is the category many monitors fall into.


Here are the dimensions in inches:
- 100 x 100mm = 3.937 x 3.937 inches
- 75 x 75mm = 2.953 x 2.953 inches
Turns out, the VESA FDMI standard covers much more than a mounting hole pattern. Here are other factors found in the FDMI specification for monitors:
- Hole spacing manufacturing tolerances
- Weight requirement per hole pattern
- Hole pattern location and sizes
- Mounting screw sizes
- Mounting plate overall size
- Mounting plate clearance area
- Mounting plate thickness
- Mounting plate material
- Mounting plate profile
- More!
Though most monitor mounts mention “VESA”, most of the time they are just referring to meeting the hole pattern and screw size spec. Not many manufacturers actually earn the full VESA FDMI compliance logo.
You can find out which companies actually earn the compliance logo here: Compliant VESA FDMI Companies. Pretty short list, isn’t it?
One company stands out to me and is very popular in the monitor mounting world. That is Ergotron. Ergotron is known as a very premium monitor mounting solution.
Them actually meeting the full compliance standard sets them even further apart and speaks to their price tag.
What Else Is Covered In The VESA Standard?
Remember VESA is an organization that has standards in many areas of consumer electronics. Monitor mounts in the FDMI specification is just one of them. There is almost too many to fit, but here is quick of a few other standards:
- Display Port
- VESA Display Compression-M (VDC-M) Standard
- VESA Adaptive-Sync DisplayCertification Test Specification(Adaptive-Sync Display CTS)
- VESA High-performance Monitor and Display – ClearMRCompliance Test Specification (ClearMR)
- VESA Coordinated Video Timings (CVT)Standard
- VESA High-performance Monitor andDisplay Compliance Test Specification(DisplayHDR CTS)
- VESA Mobile Display Digital Interface Standard
- There are many, many more. Here’s a link to their public standards.
How To Find Out If You Have VESA Mounting Holes
There are two main ways you can find out if you have VESA mounting holes.
Look for The Hole Pattern
This method is probably the easiest. Turn your monitor around and look for either a square hole pattern, or a square plate at the center.
Manufacturers sometimes cover up the hole pattern with a square plate to keep the back of monitors looking clean.
Some manufacturers like Dell hide the VESA mounting holes behind their own factory stand. So you might not see the hole pattern until you remove the factory stand.
If you see a square hole pattern and you’re not sure if it conforms to the VESA standard, grab a ruler or a tape measure. Find the distance between the holes.
If the holes are about 100mm or 4 inches apart from each other, it’s VESA compatible. If they are 75mm or about 3 inches apart, that is also VESA compatible.
Look Up Your Monitor Model
Can’t really tell from the back and don’t have a ruler in sight? Just look up your monitor model number. This can be found either in the menus of your monitor settings, or on the back of your monitor.

My monitor, for example, is a Dell U3417W. A quick google search of this takes me to Dell’s official website and under the tech specs, I’m looking for the words “VESA” anywhere.
After a few seconds of scrolling I find the following:

Perfect – VESA compatible with the 100mm mounting pattern!
Always check your manufacturer’s official website. Don’t look for detailed technical specifications on product pages like Amazon. They often miss critical specifications and are sometimes inaccurate.
Why VESA Compatibility is Important For Your Monitor
When shopping for a new monitor, I always look for VESA compatibility. You don’t have to use the VESA mounting holes, but it will keep your monitor very flexible.
Even if you plan to sell your monitor, many people like me look for VESA compatibility, so your monitor will hold a better resale value as well.
VESA compatibility is important as it makes your monitor adaptable to all of the various monitor mounting methods out there. If you don’t have the mounting hole pattern, you have to resort to non-VESA mounting methods which are not nearly as clean.
Here’s a list of what types of monitor mounts would be compatible with a VESA ready monitor.
- Desk Clamp Mounts
- Wall Mounts
- Floor Mounts
- Multi Monitor Mounts
- Stand Alone Mounts

The list goes on, but those are the main ones. That’s a lot of flexibility! These monitor mounting solutions are key to our articles on fitting two monitors on small desks, three monitors on small desks, stacked monitor setups, and even mounting monitors for use in bed.
Before You Mount VESA Monitors
If you have a VESA compatible monitor that needs mounting, here are a few things you should keep in mind beforehand. These specs will ensure you get the best monitor mount for your specific monitor and function requirements.
Weight Limit
All monitor mounts have a maximum weight capacity. Gas spring monitor arms actually have a minimum weight capacity as well!
Knowing the weight of your monitor will help you quickly determine if a VESA monitor mount will work for you or not. Remember that we will be replacing the factory stand that is currently on your monitor.
It’s a little annoying to have to disconnect your monitor, remove the stand, and manually weigh it. What you should do instead is just look up your monitor model number again.
Manufacturers that include VESA mounting holes typically list the monitor weight without the stand. They also call this “panel weight” as it’s just the monitor panel alone, and nothing else.
Here’s the example from my monitor again, the Dell U3417W. It shows the packaged weight (not relevant to us), and the panel only weight for VESA mounting.

My monitor weight is basically 17 lbs, so when I shop for a monitor mount, I need something that can handle over 17 lbs.
Ideally, find a mount that can support a few pounds more than the actual monitor weight. I like to add a little safety factor of 5 lbs or so. I would trust a monitor mount like this for my setup because it has a 26 lb weight capacity. Much more than my 17 lb monitor.

Screen Size Limit
Not only does monitor weight matter, but monitor size as well. Most monitor mounts advertise a compatible size range.
Larger monitors have more movement leverage and a different center of mass. This usually requires mount joints and such to be stiffer and a bit larger.

The size that is referenced is the diagonal screen size measurement. This monitor mount can only support screen sizes between 17 and 30 inches.

This monitor mount is universal and fits most 17''-30'' monitors. It has a durable gas spring system for easy positioning, supports C-clamp or grommet installation, and improves overall well-being by creating a comfortable viewing angle for work or gaming, reducing strain on the spine, neck, and shoulders.
Positioning Freedom
VESA monitor mounts come in all shapes and sizes. The one you need can come down to what freedom of motion you need.
Static Height Mounts
Most of the time when we are at our desk, we just need to set up our monitor once, and it doesn’t need much more adjusting.

That makes affordable options an easy choice as those typically have more restrictive motions. For example, this monitor mount below needs a tool to adjust the height. It can still turn left and right and tilt, but the height is fixed.
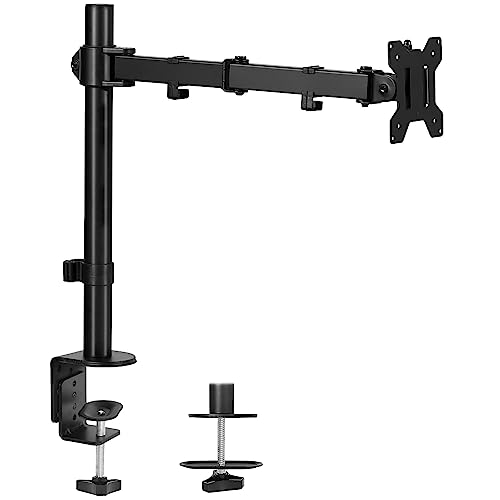
This single-arm mount fits monitors on the market between 13” and 32”, that weigh up to 22 lbs with VESA mounting. It offers adjustable height, tilt, and rotation for flexible viewing angles and integrated cable management for a clean setup.
Gas Spring Mounts
If you need a lot of positional freedom, gas spring VESA mounts are the way to go. These gas springs support the weight of the monitor at all times, and allow you to move the monitor on the fly.

Because the gas spring supports the monitor weight, moving the monitor is super easy and the monitor feels almost weightless.
Due to the benefits, these can get a little more pricey. Check out this highly rated monitor arm from Ergotron:
Ergotron is the go-to monitor mount for those with expensive monitors or anyone who wants the best monitor mount money can buy. This mount fits single screens up to 34 inches diagonal and between 7 to 25 pounds.
- Comes in three colors to match your workspace
- Clamps desks up to 2.4 inches thick
- Can be used with LX Extension for more reach
- Expensive
Instructions For Mounting a VESA Compatible Monitor
If you’re wondering how to actually use the VESA mounting system, this is what a typical installation process looks like.
Prepare The Hardware & Tools
First, you want to unbox your new VESA monitor mount. Look for all the hardware and included tools. Set those aside in an easily accessible place.
Typically this includes a set of four screws, an allen key, and depending on the type of mount you have, a separate VESA mounting bracket.
Some kits require you to have a phillips head screwdriver. Use a manual screwdriver for installing a mount to your monitor, no power tools!
Install Monitor Mount To Desk or Wall
Now install your mount per the instructions included with your mount. This will be different depending on the mount you have and if you are installing into a wall, grommet hole, or desk edge.
We want the monitor mount to be ready to go to accept our current monitor.
Remove Factory Monitor Stand
Now that our VESA mount is ready to accept our monitor, it’s time to prep the monitor itself.
Disconnect all the power and display cables from your monitor. This ensures we don’t get caught up in cable spaghetti when trying to mount it.
Then remove the factory stand from your monitor. We have a step by step guide for Dell monitors specifically, but each monitor will be different.
We want to remove that monitor stand or else we will have a weird useless stand on our monitor while it’s mounted.
Expose VESA Mounting Holes on Monitor
If removing the factory stand exposed the VESA holes, you’re done with this step.
If not, you want to either ensure the monitor mounting holes are visible, or if there is a concealing plate covering it up, remove that plate.
We want the four mounting screw holes to be visible and unobstructed.
Align Monitor Holes To VESA Mount Holes
Now lift up that monitor and align the mounting holes to the holes on your VESA mount. They should line up pretty well.
Finally, install all four mounting screws and tighten them down snugly.
Viola! Now your monitor is mounted!
Last Step – Manage Those Cables
We have a dedicated article on how to hide monitor cables like a pro. Most monitor mounts have cable management clips along the length of the arms. This makes quick work of cable management.
If you want to hide those monitor cables completely, definitely check out the article linked above.