Wall mounting an all-in-one computer has some serious benefits.
Once you wall mount, your PC doesn’t take up any of your precious desk space. You likely bought an all-in-one PC because you liked the useful fusion of a monitor + PC. That itself takes up less desk space compared to a separate monitor and a PC. So why not take it one step further?
Wall mounting can make it look like your computer is floating in mid-air against your wall, and as a result, your overall desk aesthetics are boosted.
This is easier said than done though with all-in-one computers. Typical monitors are much more straightforward to mount. Monitors support aftermarket mounting much more natively compared to all-in-one computers.
In fact, few all-in-one computers actually keep mounting in mind. And that’s why we are writing this article. We’re going to talk about three different ways you can mount an all-in-one PC.
You won’t need a specific computer for one of these methods to work. One of these methods should work with any AIO (all-in-one) PC you have.
- Before purchasing a dual monitor mount for 32-inch+ monitors, keep in mind your monitor’s weight and ideal arrangement.
- Mounts with a much higher weight rating compared to your monitor weight tend to be more stable
- There are several types of mounts that are driven by convenience, budget, and functionality. Keep reading so you know what mount is right for you along with our recommendations.
Things To Know Before Wall Mounting
We have to do a few quick checks before we even think about wall mounting our computers. This will be pretty quick if you know your computer model information. Some of this info can be found on the manufacturer’s product page.
Check For VESA Holes
When it comes to mounting and computers, VESA is the famous acronym that always comes up. In short, this is a mounting system defined by the Video Electronics Standards Association. Very fancy.
Basically, it’s a square hole pattern found behind mountable computers or monitors that measures 75x75mm or 100x100mm. If you want to learn more about VESA mounting, check out this article.
The first step with mounting your all-in-one computer is to look for these holes. If you have your model information, your manufacturer’s features or technical specs page will list this if supported.
Some computers and monitors will conceal the ugly four holes with a square panel on the backside of the device. Some models also reveal the square hole pattern when you remove the factory stand.
Here’s an example of someone mounting an all-in-one PC with VESA holes:
If you find that your computer does not support VESA mounting, don’t worry. We still have ways you can mount that computer.
Check the Weight of Your PC
Before we mount anything, it’s a pretty good idea to know how much it weighs. Heavy computers need more substantial support compared to lighter computers. This will also be needed to ensure product compatibility.
The easiest way is to go back to the manufacturer’s product page on your computer. All physical products have an associated weight that is listed within the product specs.
If you rather weigh it yourself, place your computer on your household scale. If it doesn’t meet the minimum weight requirement to actually measure, use this little hack:
Stand on the scale once with your computer and once without your computer. Subtract the two numbers and viola, there is your computer weight.
How To Wall Mount Your All-In-One PC
Now let’s get into some actual solutions to wall mounting that all in one PC. We have options for VESA-mountable computers and non-VESA-mountable computers.
VESA Compatible All-In-One PCs
For VESA-compatible computers, fortunately, the answer is very simple! There are many VESA-compatible wall mounts in the market.
To install you first mount the bracket to a stud in your wall. A stud is important to mount to as computers can get pretty heavy. We don’t want a huge hole in our drywall. After installing the wall bracket, you can mount your VESA-compatible computer using the four screws.
Here are a few heavier-duty wall mount options that are more appropriate for all-in-one PCs. I discuss the differences between each of the recommendations below.
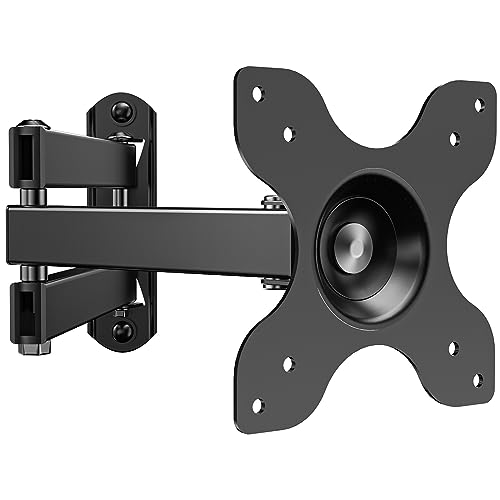
Flush Mount

This monitor wall mount fits screens 9-25 inches and has a low profile design that allows the screen or all-in-one computer to tilt and swivel. It's compatible with any brand of PC monitor that has the 75mm or 100mm VESA hole pattern.
This first option is a flush mount VESA wall bracket. This is a very affordable option because it has the fewest moving parts and the least material. As a result, you can only tilt your computer up and down. You can’t move it anywhere else.
However, a huge benefit to a mount that is forced to be so close to the wall is that the weight capacity is higher than any other type of wall mount. The mount above can support a computer that weighs up to 44 lbs!
This can give you more peace of mind that your mount has a larger safety factor. Just be sure you triple-check your monitor height before using this mount. You can’t adjust the height after installation.
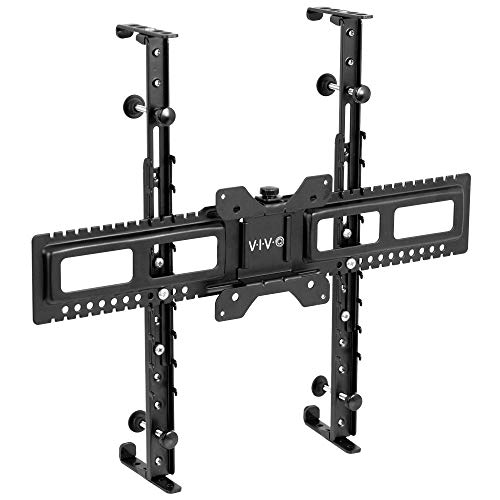
Articulating Mount
This heavy-duty wall mount is compatible with most 13 to 32-inch flat panel displays and is adjustable for viewing flexibility. It places the TV just 2 inches from the wall and extends up to 15 inches. The wall mount plate can be mounted on any vertical wood studs, brick, or concrete walls.
If you need a bit more movement and still want to keep the mount affordable, an articulating mount might be right for you.
This model linked above can extend up to 15 inches away from the wall. That’s a helpful feature for some people with deep desks. Check out our article on how desk depth should drive your monitor size.
You can also tilt this mount up and down slightly, but not a whole lot. Rotating the monitor left and right will be no problem.
Similar to the model above, you can’t adjust the actual height of the monitor so be sure to measure twice and mount to the stud once. Because we restrict some movements, this does have a relatively large weight capacity at 33 lbs!
Gas Spring Mount

This monitor arm fits 22 to 35-inch monitors and has a VESA extension for wider compatibility. It can be folded against the wall when not in use and has built-in cable management routing. It's fully adjustable with a gas spring for easy angle or height adjustment with a single hand.
For those needing a huge range of motion and on-the-fly position adjustability, a gas spring mount is hard to beat.
Gas spring mounts are capable of holding the weight of a monitor without being fixed. You can adjust the spring tension to ensure these monitor mounts don’t sag. That means you can simply move the computer around as needed. The range of motion seems pretty limitless.
I currently use a gas spring mount for my 34″ ultrawide monitor, and it is super easy to use and manipulate.
The downside of a mount that can move very far from the wall is that the weight rating starts to go down. Most of these normal gas spring mounts can only hold up to 17.6 lbs. The one linked above can support up to 26 lbs!
The increased weight rating will keep your precious computer a bit more stable and safe.
Non-VESA Compatible PCs
Now that we have the VESA-compatible computers covered, let’s move on to the other category. What if you don’t have VESA mounting holes on your computer?
First off, I wouldn’t be very surprised. It’s not very common for all-in-one computers to have VESA mounting holes. I browsed through the top-selling all-in-one computers, and very few were mount-friendly.
But there is a way around this that we discuss in our article on how to mount monitors without VESA.
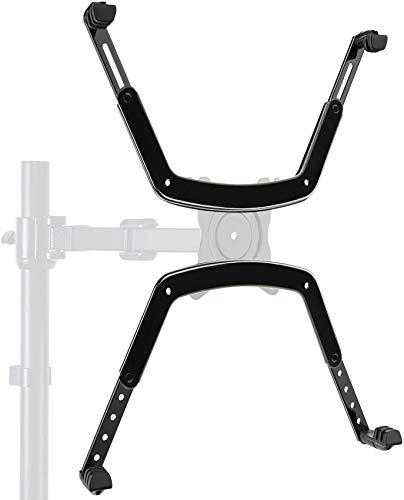
Essentially, one of our options is to force VESA compatibility with a VESA adapter. These adapters hold onto four corners of your all-in-one PC and connect those to a bracket with the VESA pattern.
Here’s an example:
This universal VESA adapter kit fits most flat and curved 20” to 32” monitors, TVs, and AIO computers lacking VESA holes. This supports up to 22 lbs, has adjustable height and depth brackets, and adds padding to protect your valuable equipment from scuffs and scratches.
Once you have an adapter installed you now have a VESA-compatible computer! You can now reference the section above on VESA mounts. Here are a few things you should keep in mind before using VESA mount adapters.
Confirm Your All-In-One PC Depth
VESA mount adapters are typically made for tvs or monitors. Today’s screens can be pretty thin, so many of these might not be compatible with an all-in-one computer’s thickness.
Confirm the VESA adapter you are buying can support the actual thickness of your computer.
Don’t Forget The Weight!
Weight is still a consideration! Confirm that the adapter you get can hold the weight of your computer.
Once you confirm that, be sure that the VESA wall mounts you get can support the weight of your all-in-one computer and your adapter combined!
Prepare For Notches
The way these VESA adapters work is by holding four corners of your computer. Each corner also has a little lip so your computer can’t fall out of the holder.
This is great for safety, but horrible for aesthetics. That’s why you should choose your adapter wisely, and prepare for the notches.
Here is one option that has the least invasive notches in my opinion.
The Alternative To VESA Mounting
Alright, if you don’t have a VESA mount, and you think those VESA adapters are hideous, this last recommendation is for you.
I’ll be honest, this one is a bit of a compromise, as it’s not exactly the same as a wall mount. The solution here is to use a high-quality floating shelf.
Before you dismiss this idea, consider the following benefits.
It fits in like any piece of furniture, and is a pretty natural extension in any home or office. Also, using a high-quality shelf will have a weight capacity well beyond any of the VESA mounts we talked about earlier.

A shelf-mounted computer can look super clean, check out this post on Pinterest. Because a shelf just gives you a strong and flat surface, any computer or monitor can be placed on it. You still get the benefits of relieving your desk of space.
You actually get even more space, because you now have a wall shelf that can support a little bit more than just a computer. I highly recommend at least considering this option. Try and visualize it in your workspace.