At this point, most people are fully aware that dual monitors provide a huge boost in multitasking ability and productivity.
There are a ton of different dual monitor arrangements though. One that I have been seeing more and more these days is the stacked dual monitor arrangement. This is when your monitors are set up so one is positioned on top of the other.
Instead of looking side to side with a second monitor, you have a symmetrical vertical setup where you glance up and down instead.
In this guide, we’re going to talk about everything you need to know about why this arrangement is superior, what you need to know before going this route, and exactly how to set them up.
Let’s get started.
Key Takeaways
- Stacked dual monitors have a significant space advantage over other dual monitor setups.
- The complete process starts with choosing your second monitor, deciding which of the two is the primary, choosing the right mount type for your situation, and ensuring you have all the connections ready to go.
- We dive into that entire process below.
Why Stack Your Monitors
So why do people lean toward stacked dual monitor setups? What’s the difference between the other dual configurations?
Stacked Dual Monitor Advantages
One major advantage of a stacked setup is that it can fit in a smaller space than a side-to-side setup. You are more likely to be limited in horizontal desk space than in vertical desk space.
Because you mount one monitor on top of the other, you don’t need such a wide space anymore to reap those dual monitor benefits.
Also, not everyone likes to twist their neck from side to side. Especially if your main monitor is an ultrawide monitor, you have to twist your neck a bit further to get to that second screen.
That’s why in my desk setup, my laptop is just for Spotify or something else I don’t need to constantly reference.

Stacked monitors rely on the head tilt, not the head turn. That could make a difference depending on the user.
Disadvantages
Stacked monitors do come with some possible disadvantages.
First, your primary monitor has to be a bit lower than usual to ensure your second monitor on top is not too high. When your second monitor is too high, your neck is going to fatigue.
Once you make that second monitor uncomfortable to look at, you will naturally use it less. And there goes all the dual monitor benefits!
The other disadvantage is that most monitors have a thick bezel at the bottom and thinner bezels everywhere else. That means when you stack your monitors, you will have that thicker bezel separating the two monitors.

This stacked dual monitor mount fits most screens 13” to 27” in size and up to 22 lbs in weight (each). The 39” center pole allows you to adjust the monitors to either a sitting or standing position, while adjustable arms offer tilt, swivel, rotation, and height adjustment.
In the setup section in this article, we’re going to talk about two ways to tackle that bezel issue.
The last disadvantage affects those who have curved monitors. When you have a stacked setup, you typically want the upper monitor angled down toward you so you get the best viewing angle.
When stacking normal flat monitors, the setup is fairly straightforward. The monitor edges line up perfectly making a very clean look.
Curved monitors on the other hand have that arc shape and when you tilt that upper monitor, you won’t get a clean line-to-line monitor transition. You have a gaping space between the upper and lower monitor.
This is a big nit-picky, but if you are big on aesthetics, this will annoy you.
Step by Step Guide To Building Your Stacked Monitor Setup
Now if you’ve made peace with those potential disadvantages and want all the advantages, let’s talk about the entire stacked monitor setup!
This will guide you through everything from your arrangement options, mounting, connectivity, and even managing those cables.
Think About Monitor Arrangement
There are many different positions your stacked monitors can be placed in. They generally fall into two major different categories that you see below.
Either you have your bottom monitor really low and tilted upward, or you have your top monitor tilted downward.

Top tilted downward is what most people usually go for. You don’t take up as much desk space as the bottom-tilted version. Also, the bottom-tilted version typically works best with smaller monitors.
A portable monitor would be a terrific pairing for a bottom-tilted stacked setup.

Stack your monitors at a lower height with this 15.6-inch portable IPS display. Its ultra-slim design and kickstand make it perfect for travel too. The hybrid-signal solution enables compatibility with any laptop with a USB Type-C or Type-A port.
Whichever version you choose determines which monitor is your primary monitor. Your primary monitor will be the one that you look at directly ahead. It will be the most functional for your primary needs.
So if you’re a photographer, your primary monitor will be the color-accurate one. If you’re a gamer, your primary monitor will be the one with the highest refresh rate. Basically, the fancier monitor will be the primary monitor.
Select a Second Monitor If Necessary
If you don’t already have a second monitor, now would be a good time to choose one. We have to keep a couple of things in mind when shopping for your second monitor.
VESA Mounting
Getting a second monitor that has the standard VESA mounting hole pattern will make your life a lot easier here. This makes it compatible with a ton of aftermarket mounting systems that can make a stacked setup much simpler.
When shopping for a monitor, ensure it mentions VESA mounting in the feature list. Most monitors come with this mounting system, but not all.
If you already have a monitor that does not have VESA mounting holes, check out our article on mounting non-VESA monitors.
Primary & Secondary
Back to the primary vs secondary monitor discussion. If you are adding a basic monitor for standard multitasking purposes, you will have a simpler time choosing your second monitor. Any typical 20″ – 24″ monitor will do.
Here is a good quality Dell HD monitor that comes with VESA mounting holes. I highly recommend Dell & LG monitors. I’ve used them both over the years with no complaints.

This is an elegant desktop monitor with a three-sided ultrathin bezel design. The In-Plane Switching (IPS) panel ensures consistent colors across wide viewing angles.
If you are a gamer, or videographer, or have some other special use for a fancy type of monitor, be mindful of your fancy monitor being your primary.
Your secondary typically does not need all the bells as whistles as this is more of a “reference” monitor.
Choose a Stacked Monitor Mount
Once you have your second monitor ready to go, it’s time to pick out a monitor mount so you can actually position one monitor on top of the other.
Here are some options that will get the job done well.
Desk Clamp Mounts
Desk clamp mounts have the smallest footprint so they look the cleanest. You do have to have a strong tabletop to accommodate them though.
You are mounting two monitors, so you need the clamp foundation to be strong enough.
If you have one of the IKEA hollow center desk surfaces or a thin desk, check out our article on how to clamp onto weak desks. You might be better off with the next monitor mount option.
Also if you have too thick of a desk, we have an article on how to clamp onto thick desks as well.

This heavy-duty dual vertical monitor desk mount fits most 38-inch flat/curved ultrawide monitors up to 26.5 lbs (12 kg) each in weight. The metal base saves desk space, while the c-clamp and grommet mounting options support up to 3.4" (88mm) desk thickness.
Here are a few examples of table clamp monitor mounts that can accommodate stacked monitors.
This first one is a very straightforward mount that doesn’t have any “arms”. It’s simply a straight pole that can position two monitors on top of each other. You can tilt/turn the monitors after you set the heights.

This dual monitor mount fits two ultra-wide screens 13” to 32” in size and 22 lbs in weight (each). Simple installation with detachable VESA bracket plates and integrated cable management.
This next one is a set of gas spring arms that are also mounted on a pole so you have a lot more flexibility on the final position of the monitors. The gas spring can actually support the weight of the monitor so you can adjust them on the fly with little effort.

Maximize your efficiency and productivity with this fully adjustable gas spring monitor mount that fits monitors up to 32" and supports up to 17.6 lbs each. The locking system provides a strong and stable connection with your desk and monitor screen while the gas spring stand allows for tilt, swivel, and rotation.
If you need much more flexibility than any single monitor mount can provide, consider using two individual mounts. You can choose one tall mount and one short mount.
Because they are desk clamps, you still use very little desk space to accommodate these mounts. That’s what David Zhang does in his setup below:
Free-Standing Mounts

If you have a weak desk or don’t want to chance it with clamps for any reason, stand-alone stacked monitor mounts are your friend.
These just use a base like a normal monitor mount, but they can hold two stacked monitors instead of a single one.
Here are a couple of stand-alone monitor mounts below:
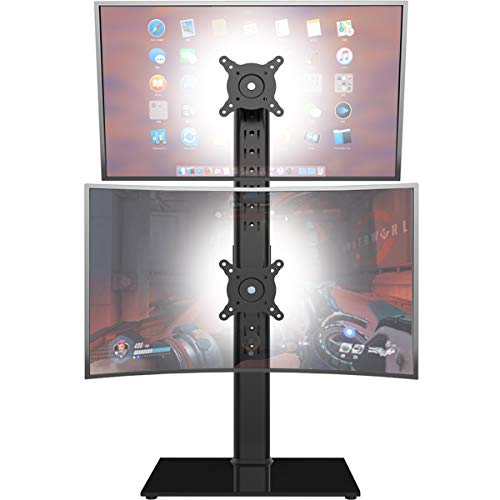
This vertical dual monitor mount holds two screens 13” to 34” in size and up to 44 lbs in weight (each) which is very impressive. Adjustable brackets offer swivel, tilt, and height adjustment so you can dial in the perfect setup. Integrated cable management keeps cords clean and organized.
This VIVO vertical dual monitor mount holds two ultra-wide screens. The adjustable brackets allow you to dial in viewing angles in portrait or landscape orientation. The base provides stability while removable VESA plates make installation easy. Integrated cable management keeps cords clean and organized.
Think About Connectivity
So far we have our monitors ready to go and our stacked mount ready to go. The next thing we need to think about is how we are actually going to get everything connected.
Your computer needs to have two display output ports to connect to two monitors.
Most computers today have no problem connecting to two HD monitors. It’s more a matter of do you have the connections available or if you need to have an adapter.
For example, many laptops these days just come with one or two USB-C ports!
If you have a desktop computer on the other hand, most of those have multiple display connections.
The most common display connections today include DisplayPort, HDMI, and USB Type C/ Thunderbolt. You can see a more complete list here.
This is what DisplayPort, HDMI, and USB-C connections look like.

If you have a USB-C port, check your computer specs to see if they are capable of carrying a display signal. If they are, you can use a docking station or a hub that gives you monitor connections.
Here’s an example of a USB-C hub with display connections. This hub can connect two monitors and has a bunch of other ports that could come in handy.
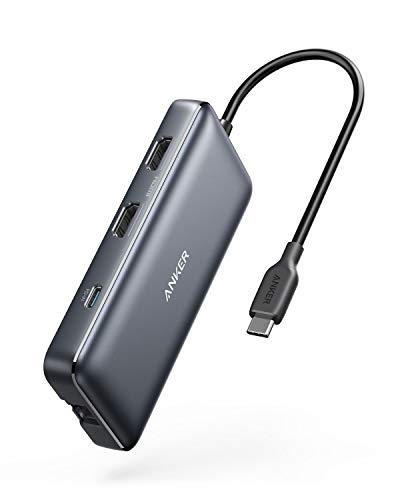
Get a big expansion of ports with this USB-C hub from Anker. Equipped with a range of functions, including dual HDMI display, pass-through charging, and more, all from a single USB-C port. Compatible with USB-C Power Delivery, this hub is a must-have for anyone looking for a single cable setup and breakdown.
Some fancy new monitors come with USB-C/Thunderbolt ports so you don’t even need a docking station or hub.
Here’s an example of a thunderbolt enabled monitor. The price tag really points to the fanciness. Deep wallets only for these monitors. Very overpriced in my opinion.
Lastly, keep in mind that your upper monitor will be further from your connections, so it might be worth getting a slightly longer display cable like this.

Connect to monitors that are further away with this 10-foot 8K 48Gbps HDMI cable. Supports 8K@60Hz or 4K@120Hz video, and Audio Return Channel (ARC) with 48Gbps bandwidth for reliable performance.
Mount Those Monitors
Now we have all the connections ready to go we can finally install!
First, set up your stacked monitor mount. You want to set it up so it’s easy to install those monitors.
Now remove the factory monitor stand connected to your current monitors. Good riddance to those space-hungry stands. Next, we will take those monitors to the monitor mount we set up.
It can help to have a family member or a friend hold the monitor while you install the mounting screws, or vice versa.
Pro-Tips For Stacked Monitor Mounting
Before we touched on how the bottom of monitors typically have a thicker bezel than the top or edges. If we really want a nice seam with the smallest bezel amount, turn that upper monitor upside down!
You will be able to tell your computer to display the upper monitor upside down too. This way you get the nice thin bezels between your dual monitor stack!
Here’s an example of someone using this upside-down upper monitor. Notice the HP logo orientation on the upper monitor?
If your connections are exposed when doing this, you can always get some 90-degree connector adapters for your display and power ports.
Don’t like the idea of turning the upper monitor upside down? We have another solution for you.
Instead of placing the top monitor right above the lower monitor, you can instead have the upper monitor tucked in behind the lower monitor.

This way you cover up the exposed bezel with the lower monitor itself! You only see the bottom monitor’s bezel.
Wire Up & Manage Cables
Now we are in the final stage. We need to tidy up those cables. Fortunately, vertically stacked monitors are very easy to cable manage.
The monitors themselves cover up most of the cables, and the monitor mounts typically provide a halfway decent cable management solution.
If you have a lot of monitor connections resulting in a cable management mess on your hands, check out our article on the best way to hide monitor cables.
It shows exactly how I got my monitor wires to look like this:

Exactly, you can’t even see them.