With standing desks becoming more popular, people are realizing that cable management is a bigger challenge. Normal desks don’t move up and down and can have other features like drawers that cover up those messy cables pretty easily.
With standing desks, most have a minimal two-leg design and all your desk electronics need to move up and down without an issue. This results in more cables being exposed and there is more risk of snagging those cables too.

In today’s connected world, a desk with zero cables is hardly an option. A nicely cable-managed standing desk can look so much better and also result in a better user experience.
In this article, we’re going to give you everything you need to know to manage those sit-stand desk cables.
Key Takeaways
Here the the three keys to a perfectly cable-managed standing desk
- Mount a long power strip underneath your desk
- This results in a single power cable going to an outlet. Only one cable is moving when you adjust the height of your desk.
- Use large cable raceways to route underneath your desk
- Cable raceways hold your excess length cables and allow them to travel across the bottom of your desk. Easily route cables from your device on your desk through the raceway into your power strip, fully concealed.
- Use cable management racks or strong double-sided tape to hold larger power bricks close to the bottom side of your desk.
Keep reading for more tips on ultra-clean standing desk cable management.
How To Cable Manage Standing Desks
Remove Unneeded Electronics
Desks can get pretty crowded with electronics over time.
I always recommend people only connect what they need on their desks. If there is any electronic device on your desk that requires cables and is not used at all, take it off of your desk.

Cable management gets way easier when you minimize the cables in the first place.
Simply remove the devices that you don’t need, or place them next to your desk instead of on top. That includes virtual assistants, or a digital clock if you always use your phone or watch to tell the time anyway.
If you can remove some cables, great, your cable management journey just got easier.
If you’re interested in minimizing more, check out our article on minimalist desk organization ideas.
Find The Blind Spots For Cables
The visual benefits of standing desk cable management are super satisfying. Not seeing many cables hanging all over the place is a rewarding effort.
To start, find the blind spots of your standing desk. These blind spots will be places where cables can be routed and stored without being seen from common angles.

Most of the time the best blind spot is directly underneath the desk. I have a couch close to my desk, so I can see pretty much everything. I have to hide cables behind the frame of my standing desk.
In almost all situations, a blind spot will be the area under your tabletop, towards the back. That’s not a place that is usually seen from normal angles. We will be managing most of our cables in this location.
Mount Your Power Strip Under Your Desk
Now that we know where the blind spots are and we’ve minimized our electronic devices, we are ready to install our power strip on our standing desks.
Mounting a power strip on (or under) your desk itself is absolutely critical.

If you have a power strip sitting on the floor, you have to route every single powered device all the way to the floor. That will make more cables visible, which is exactly what we don’t want.
Also, when you adjust the height of the desk all of those cables will need to be long enough and not tangled to make it to the standing position.
You have to worry about cables snagging when your power strip is on the floor. Do yourself a huge favor for cable management purposes. Mount your power strip underneath your desk.

I used a long 12-outlet surge protector power strip underneath my Flexispot E7 standing desk. It would have been much easier to install during the assembly of my E7. This gives me peace of mind with surges and has enough outlets for my desktop devices.
Here’s the surge protector I used:

- 2100 Joules of surge protection
- Flat plug fits in tight spaces
- 12 outlets & 6ft long cord
- Metal construction
- Outlets are pretty close together
Now I only have a single cable going down my standing desk. Everything else can be hidden up against the underside of the desk.
Once you connect a power strip under your desk, you can start to plug in all your electronics! Check out our pro cable management article for detailed step-by-step instructions on cable management.
Make Your Standing Desk An Island
Another important tip with standing desks is to keep the desk an island.
That means don’t connect anything that is on your desk to something that is off of your desk. There is a ton of risk involved with doing this.
For example, let’s say you connect your computer that is on top of your desk to a printer that is on a neighboring piece of furniture. Every time you change the height of your table, that cable will be traveling with it.
We want the moving cables kept to an absolute minimum.
That cable sooner or later will snag on something! In a worst-case scenario, it can pull your computer off of your tall standing desk! The cable itself can also be pinched in a situation like this.
The risk is real and not worth it. Keep your height-adjustable desk an island, disconnected from devices on other furniture around it.
Place Powered/Connected Items Towards Edges
When you place powered items on your desk, try and keep them toward the edges of your desk. Place them as close as you would consider them safe.
There are two benefits to placing your electronics toward the edges of your table.
First, your cable routing becomes way easier. When the cables come to the desk edge, they can be tied up and follow the desk edge out of sight.

The second thing that happens is that fewer of your cables are visible on the tabletop too. Nobody likes the look of cables on a tabletop.
Placing your devices towards the edge gives their cables a quick route out of sight.
Use Cable Raceways For Concealed Routing
Cable channels or raceways are extremely useful for routing cables along the underside of your standing desk. This conceals the free lengths of cables that go from one side of your desk to the other.

The path of a cable should go from your device > through the cable raceway > and exit at the closest point to your power strip.
The result is a very clean cable management solution that conceals almost all of your cables!
Tie Up Excess Cable Lengths
If you have super long cable lengths hanging under your desk, tie those cables up.
The only exception here is if you have a cable that actually uses the excess length. A good example is a wired mouse. If you move your device around a lot, you will need some cable slack.
With that being said, we have some tips on how to hide keyboard and mouse wires here.
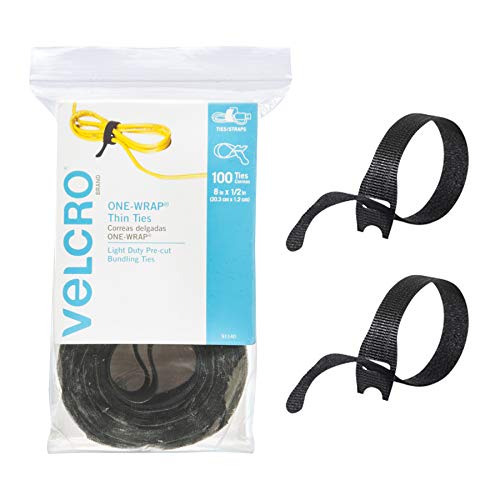
- 8 inch ties can wrap large cable bunches
- Can attach to cable with loop
- Re-usable & easily adjustable
- Can lose effectiveness when attached and detached multiple times
I like using these Velcro or other hook-and-loop cable ties to tie up my excess cables into organized bunches.
This way you don’t have to worry about cable managing a ton of free cables of different lengths. You will only have to figure out where to put the tied-up cable bunches.
Mount Computer Under Desk
If you use a desktop computer with a tower, consider mounting the computer under your desk. It’s one of the recommended ways to hide your desktop computer tower.
Here’s an example of a computer tower desk mount.
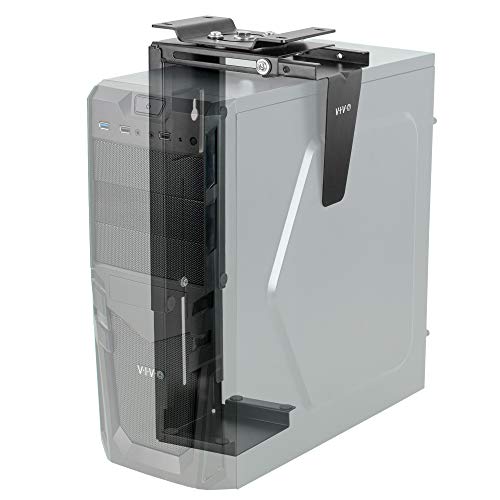
- Supports up to 22 lbs.
- Swivels for easy backside port access
- PC width range: 3.5 to 7.8 inches
- PC height range: 11.5 to 20.5 inches
- Does not support small form factor computers
- PC can interfere with standing desk frame
The goal here is the same as before, to keep visible cables to a minimum. When you mount your computer tower under the desk, cable management becomes super easy.
Cables don’t need to be routed as far anymore. You create a short pathway to the power sockets and the cable raceway solutions that are already under the desk.
Another big plus here is that you get more table space!

Most importantly, this keeps your computer off of your floor too. Computers that are on the floor build up dust and can decrease the performance of your computer.
Keep it off the floor, and consider mounting it under your table instead of placing it on top of your table.
Use Wireless Mouse & Keyboard
One set of peripherals that can make a huge difference in convenience and looks are wireless keyboards and mice. Computer mice need to move around, and keyboards can shift around too.
You would have to leave some unsightly cable slack on your desk to make sure you have enough range of motion. It’s far from ideal.

The MK345 keyboard and mouse combo features a full-size keyboard layout with a generous palm rest, spill-resistant design, and easy-access media keys, as well as a comfortable right-handed mouse. Its 2.4 GHz wireless connection provides reliable and fast connectivity up to 33 ft away. Additionally, the combo has an extended battery life of up to 3 years for the keyboard and 18 months for the mouse.
Do yourself a favor and get an easily rechargeable wireless keyboard and mouse set. Some of these devices last months before needing to be recharged.
This gives you a ton of flexibility with moving your peripherals around and your desk setup just looks better as well.
It also makes cleaning your desk a breeze when you need to remove your mouse and keyboard from the desk. It would be a bit more of a hassle with a wired set.
If you want to stick with wires, or if you just want table space, consider a keyboard tray that bolts or clamps under your desk. That is a handy way of making wired peripherals less visible, and can also give you even more space!
Here’s an example:

This under-desk keyboard tray saves desk space and holds your keyboard, mouse, and small accessories below your desk. It easily slides in and out, extending a maximum of 8.5" from the edge of your desk. The tray is attached with C-clamps that hold everything in place and are easily adjustable. (The tray is not compatible with desktops that have beveled edges.)
Tools For Standing Desk Cable Management
Now we will quickly go through some of the most useful cable management tools you can have that will make your management so much easier and cleaner.
Rack Under Desk
A cable management rack can hold power supplies and excess cables very easily. Once you attach a large rack to your desk, you can just velcro and zip-tie everything else.
This is a must-have add-on to your standing desk if you are serious about cable management.

Avoid messy hanging wires! This under table cable management kit has lots of space for cables. The under desk cord organizer tray installs to the bottom of any wood, MDF, or particleboard desk. You can even mount it on the wall and use it as a cable management wall unit.
Cable Sleeving For Exposed Groups
Cable sleeving is specifically for cables that can be seen. I use this for the bunch of cables that come out from my monitor.
I always wrap up visible cables in some attractive sleeving. This stuff below is split-sleeving, so it’s simple to wrap over any cables you don’t want to see.

All you see is one fat-sleeved bunch leaving my monitor instead of a ton of individual cables. It’s very clean and I recommend it everywhere I talk about cable management.

This black wire loom is split and easy to load wires. They come in a large range of diameters and lengths depending on how many cables you need to manage. It groups your individual cables and wraps them in this aesthetically pleasing mesh wrap.
Monitor Stand
The monitor stand that comes with your monitor usually doesn’t have very good cable management abilities. Aftermarket monitor stands are able to route your cables very neatly.
Monitor stands also give you way more table space as they clamp onto a small area of your table instead of taking up all the room under the monitor.

Ergotron is the go-to monitor mount for those with expensive monitors or anyone who wants the best monitor mount money can buy. This mount fits single screens up to 34 inches diagonal and between 7 to 25 pounds.
- Comes in three colors to match your workspace
- Clamps desks up to 2.4 inches thick
- Can be used with LX Extension for more reach
- Expensive
Velcro Straps
Zip ties are the typical recommendation for cable management. After all, they are strong and small.
However, they aren’t very flexible if you change your setup from time to time, or need to dial in your cable management as you go. Right when you cut a zip tie, it more or less becomes a single-use plastic.
That also means you have to keep buying more and more over time. No thanks!
Velcro on the other hand is removable and reusable for much longer. They hold very well too! You can easily adjust cables and update your setup without having to cut ties.
Everything can be adjusted with your bare hands and quickly too!
- 8 inch ties can wrap large cable bunches
- Can attach to cable with loop
- Re-usable & easily adjustable
- Can lose effectiveness when attached and detached multiple times
Drag Chain
If you followed our instructions, the only cable that should be coming out of your standing desk is a power strip cable. That’s a pretty clean look, and it may not need anything else.
If you want to cover up that cable or want to cover up multiple cables that are going to the floor, consider a drag chain.

Drag chains are long cable covers that are specifically designed to be moving around. They are made up of a bunch of little hinges that can be opened and closed to insert cables.
These drag chains keep the length of the cables constant and also make their motion very predictable. Almost all industrial machines that have moving cables use drag chains to do this safely.
Before You Go
If you are still on the fence with standing desks, check out our article on whether standing desks are even worth it or not. Also, check out our article on how much you should spend on desks.
Last thing, if you are running out of storage on your desk here are some effective standing desk storage ideas. Check out our guide to triple monitor standing desk setups that talk all about the productivity benefits.