Being organized is super important for having a clear headspace and actually enjoying being at your desk.
Usually, I can stuff most of my stuff into my ALEX drawers, but what if you don’t have drawers at your desk? How do you hide all the stuff?!
Turns out, there are still a ton of ways to stay organized on a desk, even if you have no drawers. Let’s talk about simple ways you can get organized without any desk drawers.
Key Takeaways
There are three steps to organizing a desk without drawers
- Declutter & Remove Unused Items
- Add Organizational Accessories
- Add Space-Saving Accessories
The first step in organizing a desk that has no drawers is to reduce the amount of “things” at your desk in the first place. This way you have less to organize in the first place.
With fewer items at your desk, use one of the many organizational solutions we touch on below. The last step is to add some space-saving and space-creating accessories to your desk.
Follow these three steps and you’ll end up with a super clean and organized workspace you’ll be excited to use every day.

Before You Organize, Remove Non-Essentials
The first thing you want to do before organizing anything is to declutter your workspace!
Try to only keep what you need at your desk and remove everything else. This step will dramatically reduce the amount of “stuff” we have to organize in the first place.
Do a little audit of everything at your desk. If you have items that you haven’t used in a few months, it probably doesn’t belong in an easily accessible area at your desk.
When was the last time you used that dusty old calculator or that stapler? If you can’t remember the last time you used it, it doesn’t belong at your desk.
Also, make sure you don’t have “undercover trash” at your desk. Old pens that don’t work, last year’s planner – introduce them to the trash can! Get rid of anything that doesn’t deserve to be kept.
If you feel like you might be a hoarder, I recommend asking a friend to help you vet the items on your desk. They can help keep you honest.
Only keeping the items you need at your desk makes a huge difference in the number of things you have to organize.
Use Nearby Storage
Getting unused items off of your desk doesn’t necessarily mean you should throw them away. If you think you might need something in the future, drop it in a bin and place it nearby storage.

Give these items a new home away from your desk. This could be a storage room, an accessible crate in the garage, or something similar.
This helps us keep essentials at our desks. Only keeping the essentials simplifies the problem of not having desk drawers. You have less stuff that would need to live in a drawer!
Size Down & Relocate Items If Possible
Sizing desk items down is yet another way to make more room. Do you have a huge 8×12 photo frame that’s taking up a ton of desk space? A 4×6 will probably work too.
Do you have a bulky full-size keyboard and don’t use the number pad? A smaller keyboard will take up much less space, and thus give you more desk area to work with.
Do you have a desktop computer that will do fine on the floor? Relocating that onto the floor will give you more floor space. We have a dedicated article on hiding your computer tower.
Think about items on your desk that might be too big or can live somewhere else. More space on your desk means you can fit more organizational solutions that we will be getting into next.
Accessories For The Best Desk Organization
Let’s talk about some of the accessories you can add to your desk to help you with organizing. Some of these will do much better than a drawer ever could!
Use All-In-One Desk Organizers
Desk organizers come in all shapes and sizes, and can be huge if you need organizational help. If your desk does not have drawers, you pretty much have your tabletop and your wall to work with.
Desk organizers come in a variety of shapes and sizes depending on your needs. Whether you have documents that need organizing or just a bunch of smaller items.
Here are a few types of desk organizers:
Document Organizers
If your workflow is document heavy, this is the solution you should be eyeing. These document organizers have dividers that let you strategically keep your papers separated and organized. Categorize shelves so each type of document has a home.

Document and Accessory Organizers
Small items like Post-Its and pens need a bit more help than a simple document tray. Accessory organizers are very feature heavy, so they can really handle anything.
For example, the item below has three document levels for document organization. But it also has a drawer that can hold pens, post-it notes, calculators, and so on.
Additionally, it has two pencil holders on the upper left tray! This gives you a ton of organization and is actually better than just having a large drawer.

Use Organizers That Utilize Vertical Space
If you have more space for a larger organizational solution, check out this wooden self-standing shelf system. This is great for utilizing that vertical space at your desk. You don’t just have to rely on your tabletop alone with this solution.

Utilize Wall Space With Pegboard Organizers
Another creative way to get organized without a drawer is to consider wall-mounted organizer solutions. We have a dedicated article on why wall-mounted pegboard organizers specifically are so awesome.
With peg boards, you have a modular organizational system on your wall and it can actually add a huge aesthetic boost.
In our article linked above, we talk all about the IKEA SKÅDIS, which is the best pegboard available in my opinion. They offer the largest variety of modular accessories that can be mounted on their boards.
Amazon also has some table clampable pegboards so you don’t have to make any holes in your walls!

Consider Under Desk Drawer Add-ons
If you don’t like the idea of all your items sitting in an organizer on top of your desk, consider an under-desk drawer add-on.
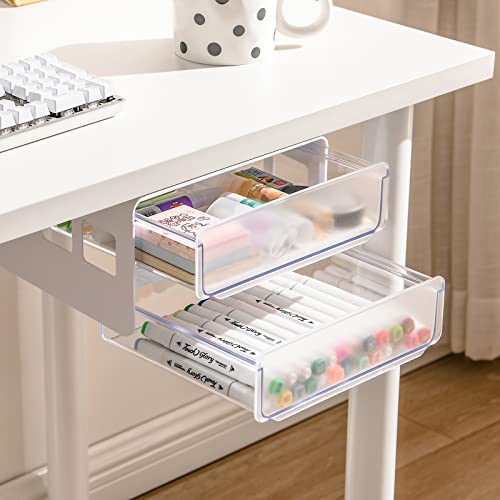
These are simply small drawers that can be mounted underneath your desk with adhesive or screws. They are small enough just so you can hide the essentials that may not look nice on top of your desk.
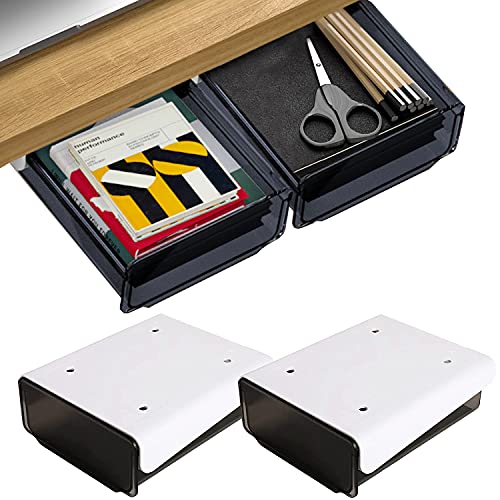
The adhesive back versions are dead simple to install and it’s almost a no-brainer why you wouldn’t use one on your desk.
Utilize Shelves & Baskets
Another way to make more space is to install some shelves around your desk. Shelves can give you a convenient place for your books, an organizer, or some accessories.
I like placing my uglier items in a nice-looking basket and then placing that basket on a shelf. This way my items are easily accessible with an open-top basket, but all anyone else sees is a great looking basket!
Nice shelves are very affordable, and can be placed right above your monitor or next to your desk. They are pretty adaptable.
You can easily find nice looking floating shelves for under $25.

Consider The Humble Side-Desk Organizer
A unique organizer that we don’t see recommended often is side-desk organizer pockets. This a simple compartment that clamps onto the far edge of your desk for a handy out-of-sight storage location.
It has a few compartments where you can store and organize items off the edge of your desk. The clamps take up a very small amount of space.

This item can hold notebooks, planners, pens, and more! It’s a pretty good idea as it doesn’t take much desk space, floor space, or even wall space while still offering organizational abilities.
Make More Desk Space
Now that we got rid of the non-essentials and have organizational solutions ready to go, let’s talk about some ways you can add even more space to your desk.
Add A Monitor Shelf & a Laptop Stand
A great way to make more space is by using accessories that lift items on your desk. In this example, we can lift our monitors with monitor shelves, and our laptops with laptop stands.
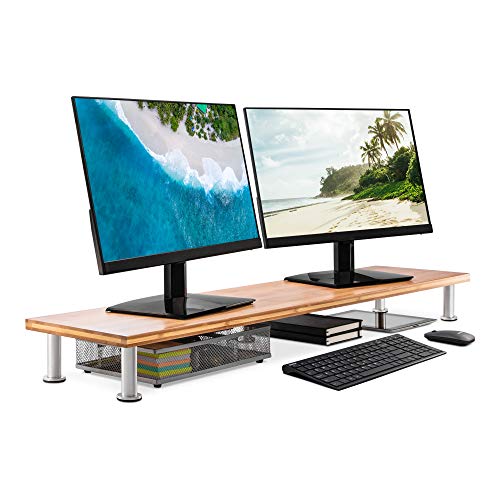
Monitor shelves have a ton of benefits, but for our purposes, they create a storage area under the shelf. It also props up your monitor to a more ergonomic viewing height. It is such a simple solution to making more desk space.
You can place a docking station underneath, a handy storage tray, and so much more.
- Comes in natural wood, black, and brown colors
- Supports up to 100 lbs
- Comes with 5x Stainless Steel legs
- 42 inch x 10.5 inch top platform
- Lifetime Warranty
- Stainless legs might be too "shiny" for certain desk setups
If your laptop is usually taking up space on your desk, consider a desk-clamping laptop stand. We compare laptop arms to regular laptop stands here.
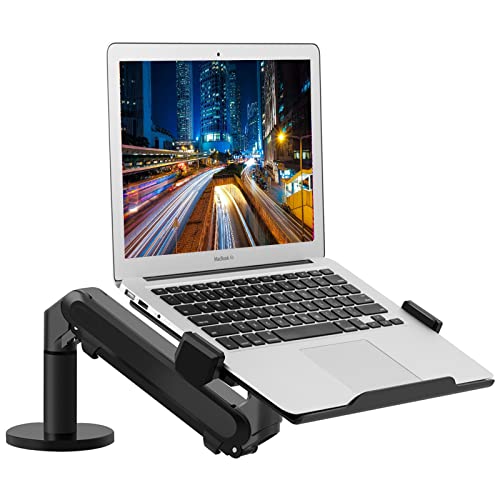
They lift your laptop to a more ergonomic viewing height as well and give you back a very significant amount of table space. I use one myself.
You can fit books, flat pen holders, document organizers, and so much more underneath a monitor shelf or laptop stand.
Use A Keyboard & Mouse Tray
You’ve probably seen those desks where the keyboard and mouse tray slides under the desk. Turns out this is a great way to make a ton of space back on your desk.
A full-size keyboard and mouse can take up a decent amount of space. If you have a small desk, it can feel pretty restricting.
A keyboard tray can be added to your desk setup very easily. You can either use a screw-on tray or a clamp-on tray. Both work just fine.

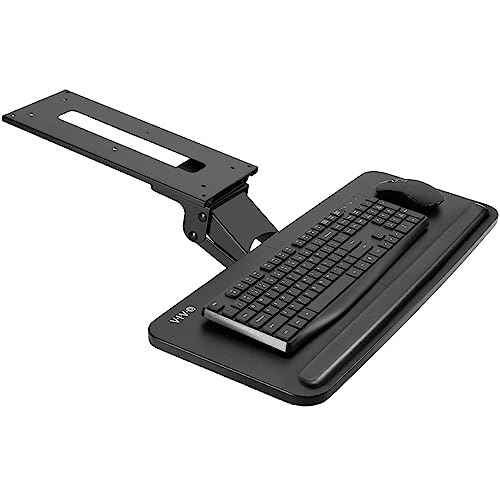
Most of these keyboard trays can be hidden from sight by simply sliding them into the desk. I would recommend that you use a wireless keyboard and mouse for the smoothest experience.
You get more space on your desk which makes it way more adaptable.
Use After-Market Monitor Mounts
This last method is to use aftermarket monitor mounts for your monitor. Below is an example of one I use on my desk right now.

Monitors typically come with a factory monitor stand that can take up a lot of desk space. They are very clunky and not space optimized.
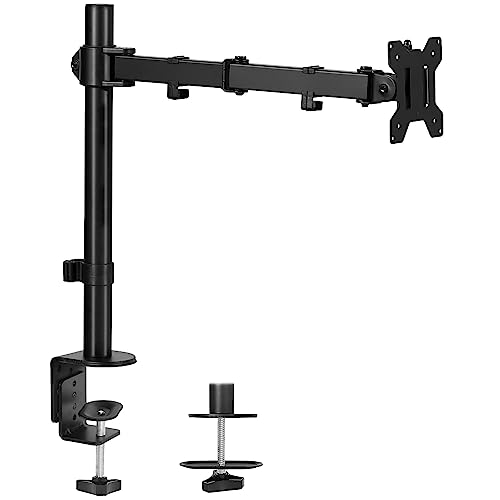
Aftermarket monitor mounts use a small clamping location on your desk while an extended arm holds your monitor in front of you. This opens up a ton of space directly under your monitor.
The added space is just one of the benefits monitor mounting arms have. We have a full article on the benefits of monitor arms here.
I personally will never go back to using factory monitor stands.