Nothing is more annoying and distracting than sitting at your desk ready to work and having your chair slowly sinking to the floor.
In this article, we’re going to tell you how to permanently fix this issue.
Many other folks talk about using some scrappy solutions that use duct tape, hose clamps, and plastic piping, but we’re not going to waste your time with those temporary fixes. Those can lead to more damage to your chair.
We’re going to walk you through how you can properly fix your chair by replacing your chair’s gas cylinder. Anyone can do it at home.
Key Takeaways
- The reason office chairs don’t stay up when you sit down is due to a failure in the chair’s gas cylinder.
- These gas cylinders are supposed to be airtight, and if your chair keeps sinking, that means your cylinder is likely leaking under pressure.
- A gas cylinder can be easily replaced for under $25 and anyone can change out a gas cylinder at home.
- There’s no need to replace your entire chair, just replace your chair’s gas cylinder!
Why Office Chairs Won’t Stay Up
If you have a chair that keeps sinking under your weight, it’s likely an older chair with a worn-out gas cylinder. It’s also possible that cheaper components were used on the chair you’re in, causing their parts to fail sooner.
The way office chairs are able to move up and down is with a spring-loaded gas cylinder. This is the part you see between your wheelbase and the actual chair.

How Gas Chair Cylinders Work
These gas cylinders or “gas lifts” work by supporting you and your chair’s weight with a pressurized air chamber.
That’s why when you sit on your chair you feel some ‘give’ or bounce. That’s the air in the cylinder being compressed a little bit.
There is a small button on the top of these gas cylinders. Chair manufacturers add a lever that presses this button when the lever is pulled.
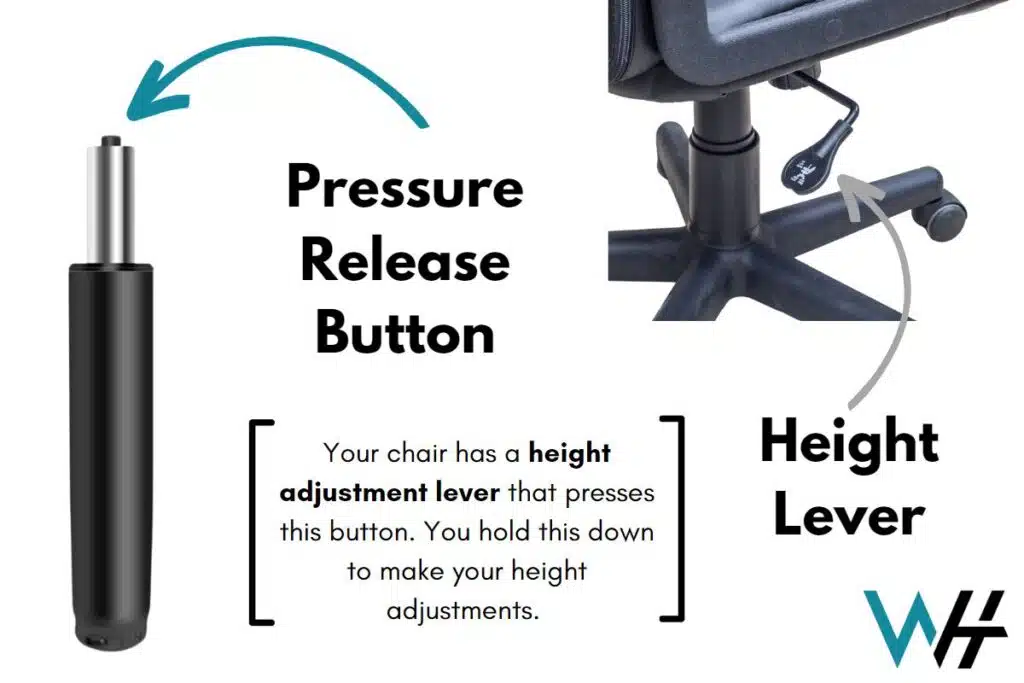
When pressed, it releases the pressure and either compresses under your weight (chair goes down) or extends with the internal spring under no weight (chair goes up).
Because the air cylinder on office chairs is the only component that controls seat height, it is likely responsible for your chair not staying up. Replacing this component will result in your chair holding your weight properly again.
Before Replacing Your Gas Cylinder
Before you move on, it’s a good idea to verify if your chair is still under warranty. A failed gas cylinder likely falls under the manufacturer defects category.
Cheaper office chairs might have a standard 1-year warranty against manufacturer defects. Higher end chairs like Herman Miller or Steelcase have much longer warranties.
Find out if your chair is under warranty. Better yet, just reach out to the manufacturer and see if they will do anything to help you out. Good brands usually stand behind their products.
Now that we understand how an air cylinder controls our height and is responsible for our chairs not staying up, let’s talk about how you can replace this component.
How To Replace Your Chair’s Gas Cylinder
Replacing your chair’s air cylinder will fix your chair’s sinking problems. In this section, we’re going to talk about how you can replace this air cylinder yourself. It’s a pretty simple process.
The only required tools here are a hammer and a pipe wrench. If you don’t have a pipe wrench, some locking pliers will also do the trick.
Before we do anything, it helps to understand how a gas cylinder is attached to your chair. This helps us know how to disassemble and remove the cylinder.
It’s actually very simple. A chair’s gas cylinder does not use any fasteners or screws. It is press-fit into your chair and the chair’s wheelbase. They stay in place and get even more secure when you sit on your chair because it is sandwiched between the wheels and the chair.
That’s we will need a hammer or mallet to force these press-fit connections loose. check out the video above on removing a cylinder for those who need a visual.
Step 1 – Remove The Gas Cylinder From The Wheelbase
The first step is to remove the piston from the wheelbase of your chair.

To do this, you want to place your chair on the floor so your chair wheels are up in the air. You will see the gas cylinder extending below your chair’s wheelbase.
We want to hold the wheelbase up and give a solid hit to the gas cylinder with our hammer. You don’t want to hit the cylinder in the center. Aim for the outer rim because that is what needs to be broken loose.

If you’re worried about not being able to hit the edge of the cylinder, place a wood block or something similar on the cylinder. This will contact the rim and give you a larger target to hit.
Be sure to hold the wheelbase well, that way it will travel in the opposite direction of your hammer hit.
One solid hit should be enough to break the connection loose. If it’s an old chair, you may have to give it a couple of hits to break loose.
When you’re done, your wheel assembly should be separated from the rest of the chair.
Step 2 – Remove The Gas Cylinder From The Chair
This step might be the hardest and require the most elbow grease.
In this step, we want to break the connection between the chair and the old gas cylinder. To do this, grab your pipe wrench or some large locking pliers. The larger the tool you use here, the more leverage you have.

You might also want to ask a friend or a family member to hold down the chair so you can focus your effort on handling the wrench.
You want to clamp your wrench on the actual cylinder itself as close to the chair connection as possible. While clamping down on the cylinder hard, try to rotate and pull the cylinder away from the chair.
This might take a couple of tries and a lot of effort if you have a really old chair. Here’s a video showing this process in more detail:
If this process is proving way too difficult, there is a kit you can purchase to make your life a little easier. This kit below is by Office Oasis.
They have a unique collar system that lets you remove this connection by simply turning some screws that slowly pry the cylinder away from your chair. It’s super effective and well rated.

This makes the removal process much easier and a little less barbaric. Plus this kit comes with a replacement cylinder as well, how convenient!
Step 3 – Purchase A Replacement Cylinder
Almost all office chair gas cylinders come in a standardized size. You will be fine picking on off of Amazon. The specs you want to look for are weight capacity, travel length, and a color that matches your chair.
Choosing a higher weight capacity will ensure a stable experience. If you are on the lighter side, you don’t have to look deep into this spec. This cylinder below can support 1000 lbs which means it should be rock solid.

Travel length can match your current piston or you can choose one that travels even more. Typical travel length can be anywhere from 2.5 inches to 8 inches.
Colors are typically matte black for most office chairs, but if you have a fancy chrome-finished wheelbase, get a chrome-finished piston like the one below to match.
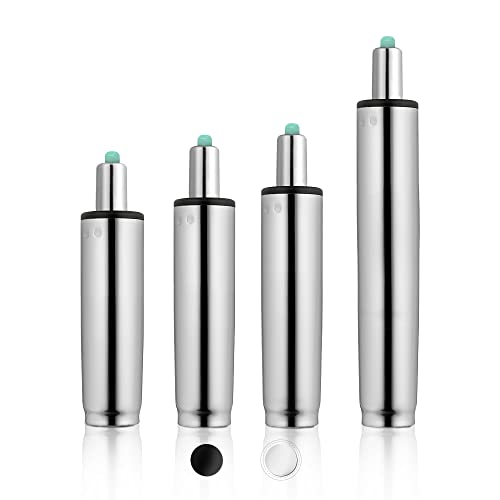
I try and match the cylinder color that I am replacing just so the chair still looks straight from the manufacturer. I would also measure the dimensions of your old cylinder so you can match those dimensions to the new cylinder.
Step 4 – Install New Cylinder
Installing a new cylinder is much simpler than removing the old cylinder. You simply sandwich the piston between the chair and the wheelbase.
This may seem like it’s not properly installed because there was no use of force but this is normal. When you sit on your chair, you add pressure to both connections which presses them deeper into place.
Simply sitting on the chair is the last step in completing the installation of your new gas cylinder! Your chair should not be sinking and should now be staying up!