As a long-time user of monitor light bars, I was excited when BenQ reached out and provided me with the latest ScreenBar Halo for review.
I swear by monitor light bars these days and recommend them to anyone who mentions desk lighting. I talk about the purpose and benefit of monitor light bars here.
I’ve been using the original ScreenBar for a while now and it has served my purposes just fine so far. I am very curious to see how this new ScreenBar Halo improves on its original version.
This will be a full and honest review of the ScreenBar Halo so you can determine if it’s right for you. (Spoiler alert, the ScreenBar Halo will be living on my monitor for a while.)

Key Takeaways
- The ScreenBar Halo is a monitor light bar that not only illuminates your desk but lights up the wall behind your desk too. No other products on our list of the best monitor light bars had this feature. . It aims to be an all-in-one desk lighting solution.
- Unlike any other light bars on the market, the Halo comes with a backlit wireless control puck that can adjust brightness, temperature, light modes, and even remember your favorite settings.
- The ScreenBar Halo comes at a high cost, so prepare your wallet. However, you do get what you pay for in terms of build quality and functionality.
Enhance eye comfort with this monitor light bar's integrated backlight design that illuminates your back wall (bias lighting). With a smart wireless controller, it's easy to adjust brightness and color temperature. Its patented clip design mounts on almost any monitor, saving valuable desk space, and it's powered via USB, eliminating the need for extra wires.
Overall Pros & Cons
The ScreenBar Halo does a lot well and definitely improves on its predecessors, but has a few downsides as too. Here are the overall pros and cons.
Pros
- The light bar is larger with an increased beam spread. Will work well on large desks.
- Works with curved monitors by spacing the lightbar further forward.
- Works with webcams if you buy the webcam accessory.
- Works with thin monitors when used with provided spacer pad.
- Bias lighting addition is a super functional addition for comfortable viewing.
- The responsive wireless control puck is beautiful and has lots of functionality.
- The control puck has an 18-month battery life!
Cons
- Comes at a high cost of $179.
- Wireless remote uses AAA batteries instead of rechargeable ones.
- Max light bar brightness is reduced when using the rear Halo.
- Can’t adjust the brightness/temp of the light bar and the rear halo independently.
- The USB power cable is permanently attached to the light bar, unlike previous models.
What Makes The ScreenBar Halo Different?
BenQ made a lot of changes compared to the original ScreenBar and the ScreenBar Plus. Here’s an overview of what the ScreenBar Halo can do.
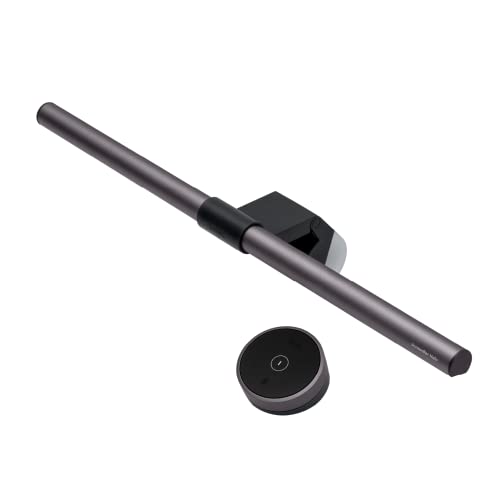
The Light Bar
Right out of the box, I noticed that this light bar was larger than the average light bar. It’s a full two inches larger than my original ScreenBar. As a result, this lights up a larger area than both predecessors.

Crunching the numbers, it lights up a 40% larger area! So you will see the returns of having a larger light bar. This is great for those with large and deep desks.
Here is the light area coverage of the three BenQ ScreenBar options:
| BenQ Light Bar Model | Lighting Coverage | |
| ScreenBar Original | 60 x 30 cm | 1800 cm2 |
| ScreenBar Plus | 60 x 30 cm | 1800 cm2 |
| ScreenBar Halo | 63 x 40 cm | 2520 cm2 (+40%) |
The build quality is fantastic, nobody comes close to BenQ here. The straight section that houses the LEDs is a full metal construction and has a clear window that protects the LEDs too.

As usual, the light direction is well controlled and there is a sharp cutoff so none of the light spills on your monitor. This is core to all good monitor light bars and why you don’t get any screen glare.
As usual, you can control brightness and color temperature.
They changed the location of the ambient light sensor. It now sits in line with the LEDs pointing directly at your desk. I expect this gives the auto-dimming feature a better reference.
The light bar comes in a dark metallic gray finish, similar to the ScreenBar Plus.
The monitor mount is weighted and spring-loaded which keeps the light bar well planted on your screen. The rear weight is what has the integrated rear Halo light.
The Integrated Halo Bias Light

Giving the ScreenBar Halo its name, the rear “Halo” light bounces light on the back wall of your desk to ease the eye strain from your monitor. This backlighting is critical to having a visually comfortable desk setup.
I introduced Govee light bars behind my monitor for this exact reason. Here is the Govee Light Bar review if you want an RGB bias lighting solution.
The Halo can be adjusted in color and temperature, just light the desk light itself. Naturally, it places itself in a very good position towards the top of your monitor.
The Wireless Control Puck

The control puck has a lot more features than the other random Amazon brands that have been adding wireless control devices.
There are six capacitive touch controls along with a large radial dial on the outside of the puck. Here’s what you can control with the puck:
- Power Toggle
- Light Brightness
- Color temperature
- Lighting Mode
- Save a “Favorite” Lighting Setting
- Auto Dimming Activation
The control puck also lights up so you can place it anywhere and still clearly see what setting you are adjusting.

The build quality here is fantastic. It’s weighted well so it’s planted on your desk and the control dial is so smooth with no mechanical play. It’s a really nice control to use.
The wireless control works within a one-meter range. That’s plenty of range for a desk setup.
The lighting modes button cycle between the following light modes with this control:
- Halo Light On
- Light Bar On
- Halo + Light Bar On
What’s In The Box

Here’s what you get in the box with your ScreenBar Halo.
- The ScreenBar Halo Light Bar (Integrated USB-Type A cable for power)
- Wireless Backlit Control Puck
- 3x AAA Batteries (For the control puck)
- Curved Monitor Adapter
- Foam Pad for Slim Monitors
- Quick Start Guide, Manual, Warranty, Etc.

Note that the webcam accessory is not included with the ScreenBar Halo. This is sold separately and makes quick work of making pretty much any webcam compatible.
If you are heavy on video conferencing, I recommend you get this accessory. It might even work with other light bars that have a flat top surface.
My Experience With The BenQ ScreenBar Halo
Setting Up The Light Bar
Light bars don’t have a very complicated setup process. Simply attach the mount to your monitor with the weighted spring-loaded clip, and plug it in with the USB Type A cable.
As with all light bars, you need to provide your own power source. BenQ recommends a 5V 1.3A source. If you want to power the Halo with your monitor, make sure your USB port has a current rating above 1.3 amps for the best results.

I was a little sad that BenQ ditched the removable USB-C cable that the original ScreenBar used. It was so easy to remove my light bar when I wanted to clean my monitor or the light bar itself.
They likely did this to force you to use the correct cable that can support the max power consumption.
I have my power cable routed all the way under my desk to a USB charging hub, so the installation took me a little longer to swap light bars.

Thankfully BenQ ships us AAA batteries to use with the wireless control puck. No need to go searching for my own.
Once those are installed you are good to go, no pairing or anything necessary to get it to work with the light bar.
Lighting Modes
The highlight feature of this light bar is the rear Halo light for some nice background illumination. It makes the BenQ ScreenBar Halo a leader in the monitor light bars for eye-strain.. You can control which of the two lights is on by cycling through the mode button on the control puck.
You can choose to have the halo on alone, the light bar on alone, or both the halo and the light bar on at the same time.


I noticed right away that when you turn the rear halo on, the lightbar dims a bit. If you want a very bright light bar, keep in mind that you get the max light bar brightness when the halo is turned off.
There is also no way to control the brightness and temperature of each light individually. If you want a super warm halo and a normal light bar temperature, you can’t do that.
The brightness and temperature controls apply the setting to both lights.
While the rear light is a great place for people to start relieving some eye strain, I find that it is a bit dim to make a huge difference in eye comfort.
This might be due to the fact that I have been using two more powerful Govee Light Bars as my backlight. I have a dedicated article on how I set up my Govee lights.
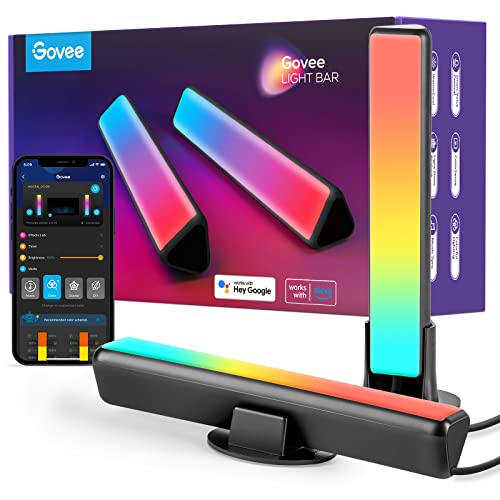
- 16 Million Colors
- Included brackets make setup easy
- Smooth and even lighting
- Feature packed mobile app
- Works with smart assistants
- Has a Stream Deck Plugin!
- 8ft max distance between bars
- RGB is not as bright as white settings
- Occasional wireless control issues
They are much brighter and are also RGB LEDs, they almost light up my whole room at max brightness. If I didn’t have these Govee lights for comparison, I might be content with the smaller rear light of the ScreenBar Halo.
See the difference below with just the Screenbar Halo, and then just my Govee Light Bars.


Favorite Setting & Auto Dimming
I love that BenQ added a favorite mode. You can dial in your ideal color temperature and brightness and save that setting.
All you have to do is dial in your perfect settings and press and hold the little heart icon for 3 seconds.

Personally, I stick to the auto-dimming mode. This sets the color temperature to 4000K and automatically adjusts the light based on the ambient light. It’s easy enough to increase or decrease brightness with the control puck.
When you change anything, it automatically turns the auto-dimming setting off. I’m not sure why BenQ makes the color temperature fixed with the auto-dimming mode. It would be nice to have the brightness automatically adjusted
Control Puck Usability
Back when I was checking out other reviews of the ScreenBar Halo, I saw lots of people complaining that you had to hover your hand over the control for it to activate.
Because I have not experienced this whatsoever, I am almost certain BenQ updated this feature. The control puck has been very responsive at a moment’s notice. No complaints from me here.

Apparently, BenQ considered designing an internal rechargeable battery but found they would get a longer battery life of 18 months with AAA’s. I guess I prefer a long AAA battery life to constantly charging a shorter battery life.
Coming from the original ScreenBar that had controls on the top, the puck is a much better solution. I always destabilized my light bar previously when I had to press the buttons on top.
The weighted control puck is just a pleasure to use instead.
Curved Monitor Adapter

Curved monitor users have always wondered if they need a unique light bar for their curved monitor setup. Check out our article on when who really needs curved light bars here.
I myself use the Dell U3417W, a curved monitor. I haven’t really had problems with my original ScreenBar because my monitor has a 1900R radius, which is big. A big radius means it’s not an aggressive curve and is more likely to work with normal light bars.
I only had some of the light bar beam clip the top edges of my screen. It never affected my viewing experience though. With the ScreenBar Halo being longer, this would be an issue though.
The image on the left does not have the curved monitor spacer and the image on the right does have the curved monitor spacer. Notice how it spaces the monitor light further out?


The BenQ ScreenBar Halo comes with a curved monitor adapter that solves the issue for screens with aggressive curves down to 1000R! I haven’t seen many monitors under 1000R radii, so this should take care of most people on the market!
It works by simply adding a spacer in front of your monitor. That pushes the light bar further out so the edges don’t clip your monitor anymore! Such a simple and effective solution.
I installed the ScreenBar Halo on my monitor with the curved monitor adapter now.
The only other monitor light bar I’ve seen that does this and has even more monitor compatibility is the Quntis Monitor Light Bar Pro+. Check the full review of the Quntis Pro+ here.
Optional Webcam Accessory
One of the long-time issues with monitor light bars is that they took up the home of webcams. BenQ finally addressed this by offering an optional accessory for those that need their webcam.


It’s a very simple two-piece device. It comes with an adhesive back metal plate and a magnetic little tower that holds a webcam.

This webcam mount is adjustable and can be moved back and forth to fit your needs. It's compatible with different types of webcams and comes with a magnetic adapter designed for ScreenBar Halo usage.
The magnetic feature is nice because it lets you slide the webcam tower back and forth to dial in the perfect composition.
At the time of writing this accessory costs $20. Anyone who has a random light bar with a flat top area can probably use this device too.

Here is it installed with the BenQ IdeaCam. Check out our full review of the IdeaCam here.
Verdict

It’s safe to say that BenQ ScreenBar will be living on my monitor for a while. It meets all of my needs and it provides my desk with a much larger beam spread. The control puck is a super nice accessory and almost makes the rest of my desk look better.
Enhance eye comfort with this monitor light bar's integrated backlight design that illuminates your back wall (bias lighting). With a smart wireless controller, it's easy to adjust brightness and color temperature. Its patented clip design mounts on almost any monitor, saving valuable desk space, and it's powered via USB, eliminating the need for extra wires.
BenQ hit all of the pain points with monitor compatibility and webcam compatibility too. If you need one light bar that just does it all and you are willing to shell out the premium cash, the ScreenBar Halo is for you.